Printable Bike Hand Signals
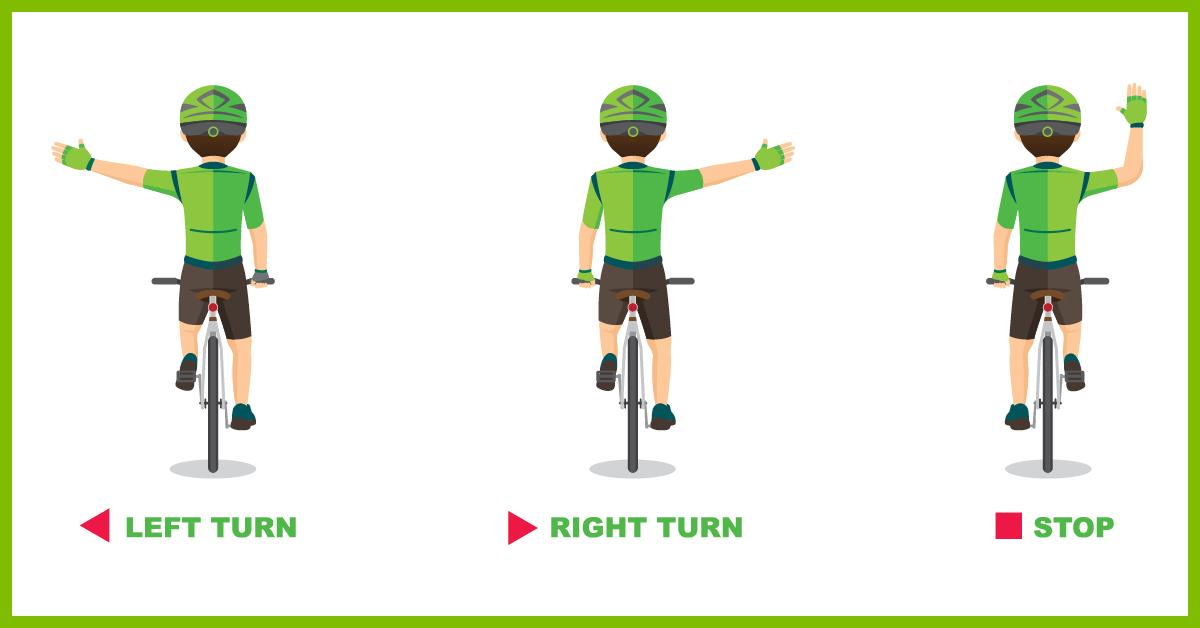
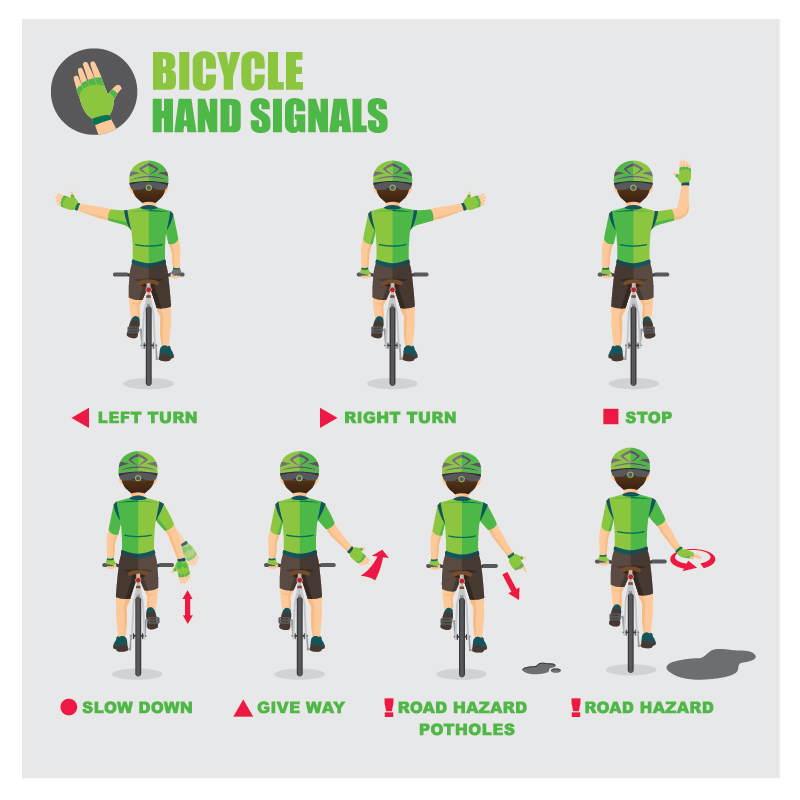
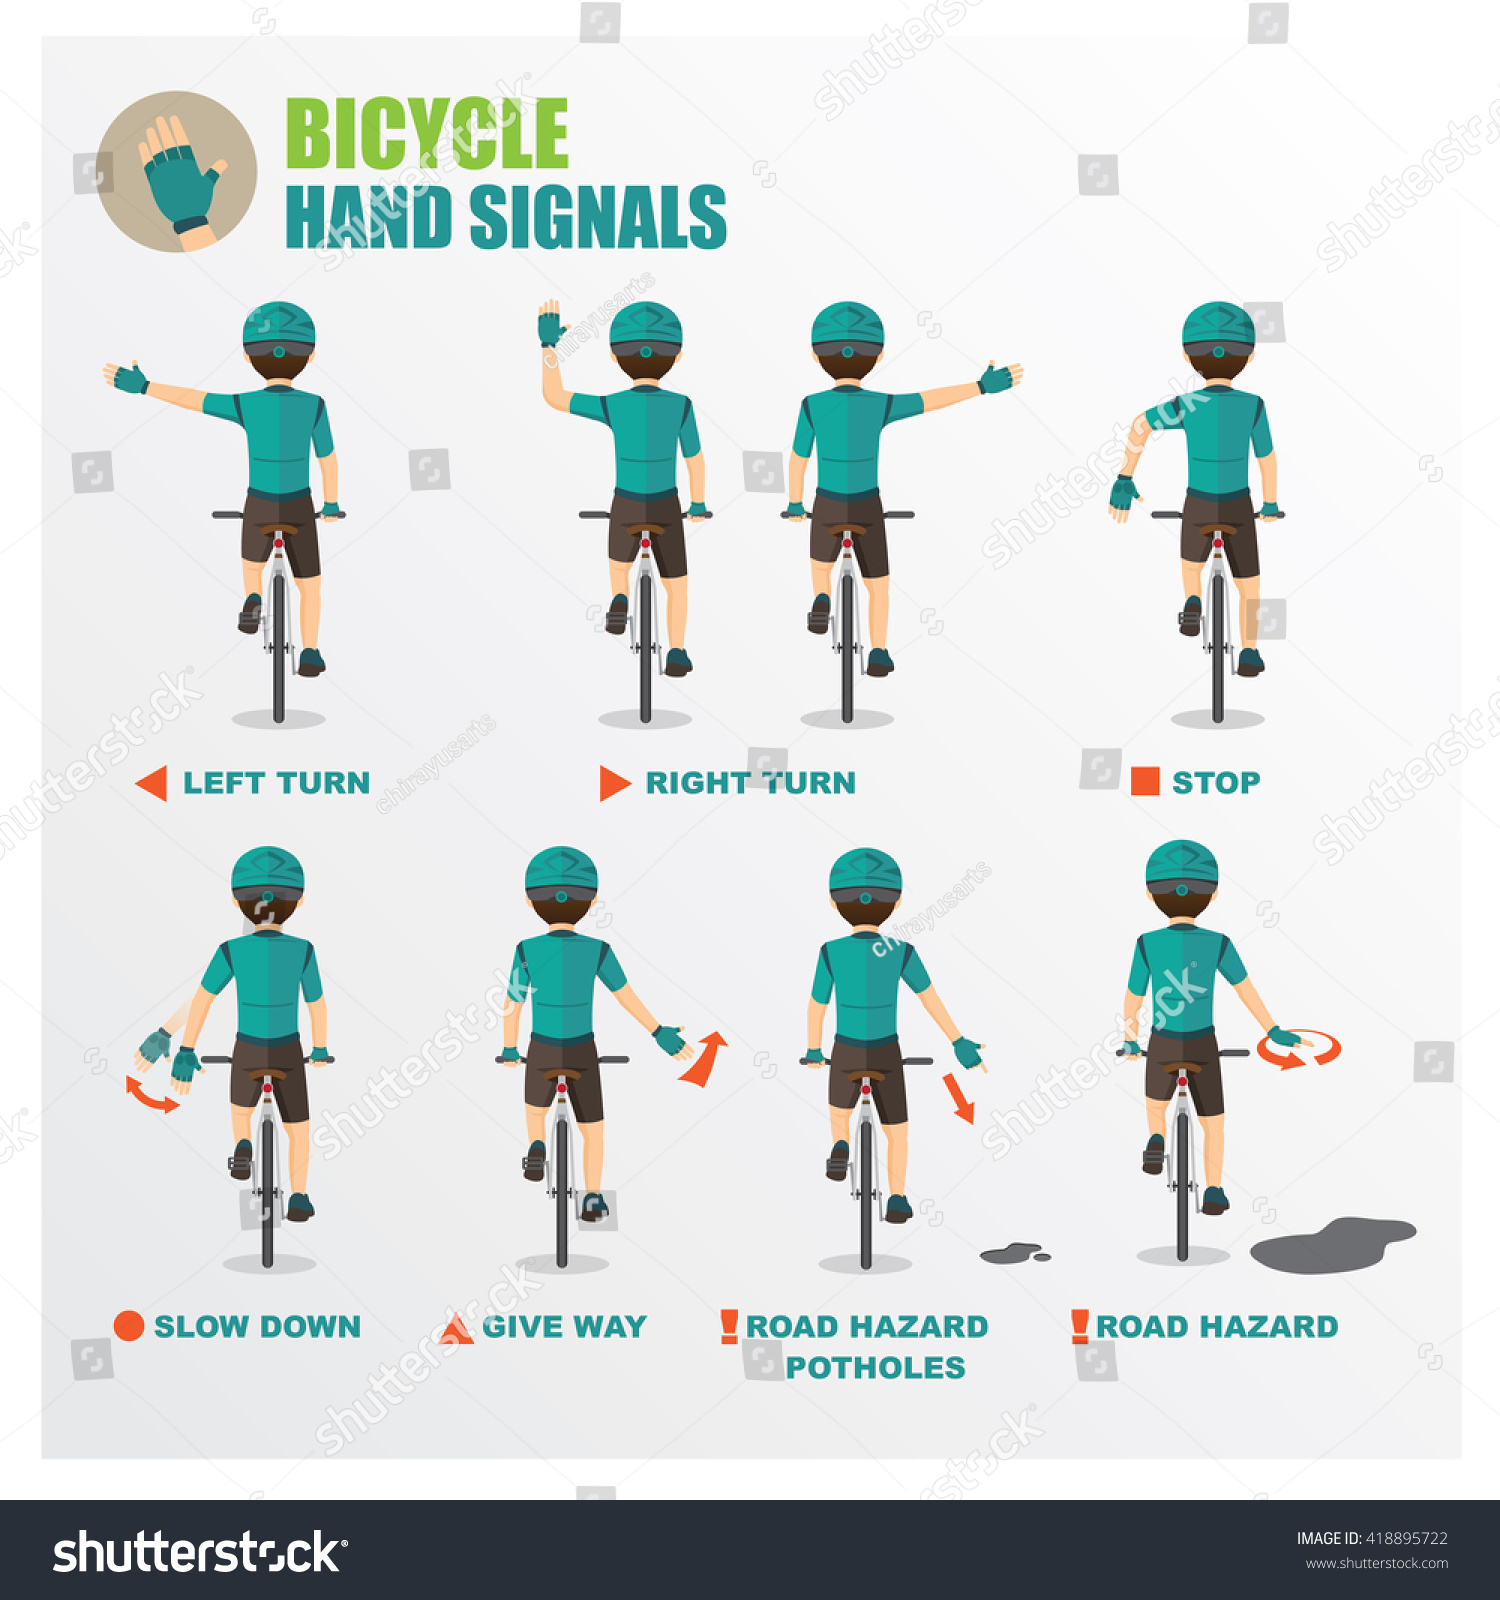
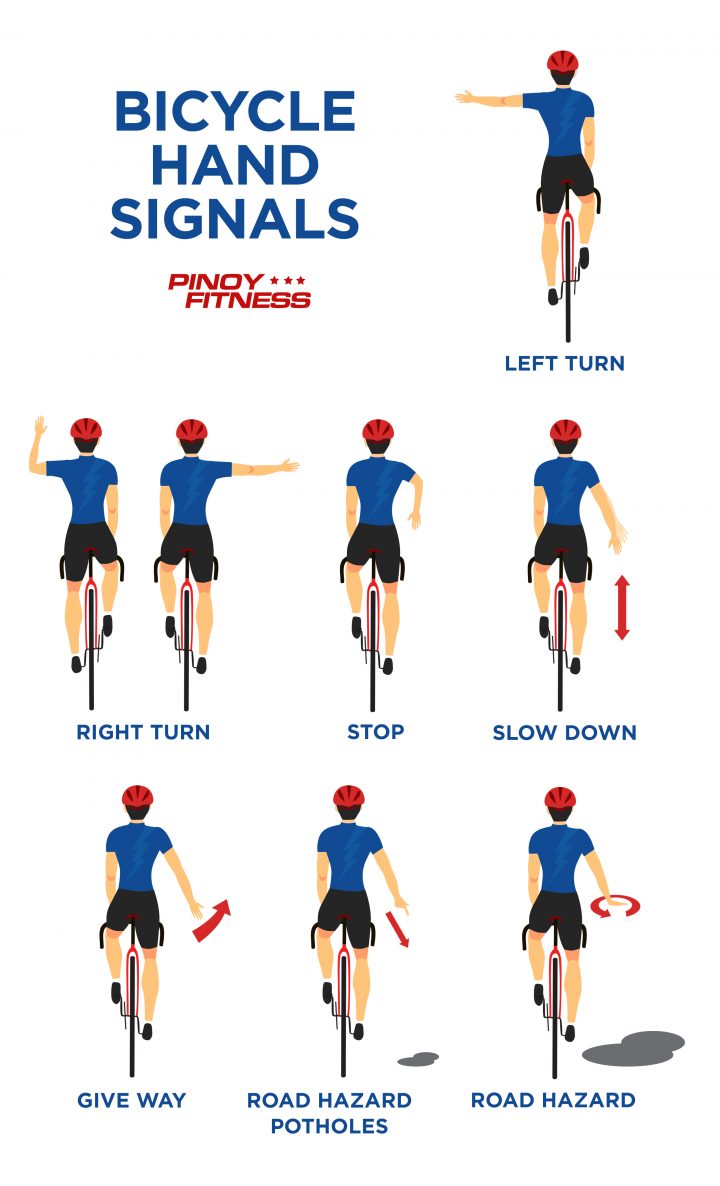
Printable Bike Hand Signals - Hand signals for biking use your hands to signal turns and stops! In this printable, geoffrey shows kids the proper signals, plus they can play a matching game and color the sheet. Make learning hand signals part of your child’s bike riding safety tips. Hold this signal for two to three. This handout discusses how to let other road. This forms an arrow pointing to the right. Hand signals that are used by bike riders to let people around them know their intentions. Always make sure you can control your bike first! Now that you are driving your first vehicle (your bicycle), it’s time to learn some of the rules of the road for communicating with other road users. Hold your upper arm at shoulder level with your forearm bent, so that your hand is against the side of your body. Now that your child is driving (his bicycle), he needs to learn the rules of the road. In this printable, geoffrey shows kids the proper signals, plus they can play a matching game and color the sheet. Make learning hand signals part of your child’s bike riding safety tips. Bend your left elbow, and stick. This forms an arrow pointing to the right. In this guide, we’ll cover the most commonly used hand signals that will help you become a safer cyclist on the road and allow you to communicate clearly and effectively with other cyclists and. Hold this signal for two to three. All illustrations by matt ward / www.linguistine.com. Hand signals are the easiest way to communicate with others while you are riding your bike. This image from national highway traffic safety administration (nhtsa) shows hand signals. Find out how to use them properly, when to signal, and what they mean to. In this printable, geoffrey shows kids the proper signals, plus they can play a matching game and color the sheet. Hand signals for biking use your hands to signal turns and stops! Signal right turns by extending your right arm or upturning your left arm.. This image from national highway traffic safety administration (nhtsa) shows hand signals. Here are the most common hand signals you need to know when riding in a group. Hold this signal for two to three. This forms an arrow pointing to the right. Bend your left elbow, and stick. It’s a great idea to use hand signals to communicate to other people on streets and bike paths when you are turning or stopping. While flipping the bird is a hand signal most people will comprehend, you can. Here are the most common hand signals you need to know when riding in a group. Now that you are driving your. Bend your left elbow, and stick. In this printable, geoffrey shows kids the proper signals, plus they can play a matching game and color the sheet. Make learning hand signals part of your child’s bike riding safety tips. The first step in using these signals for safe riding is learning how to perform them and practicing the motions. Hold your. In this printable, geoffrey shows kids the proper signals, plus they can play a matching game and color the sheet. In this guide, we’ll cover the most commonly used hand signals that will help you become a safer cyclist on the road and allow you to communicate clearly and effectively with other cyclists and. While flipping the bird is a. Signal left turns by extending your left arm straight out to the left. Signal right turns by extending your right arm or upturning your left arm. Here are the most common hand signals you need to know when riding in a group. This forms an arrow pointing to the right. Hold your upper arm at shoulder level with your forearm. Hand signals for biking use your hands to signal turns and stops! Find out how to use them properly, when to signal, and what they mean to. All illustrations by matt ward / www.linguistine.com. Always make sure you can control your bike first! The first step in using these signals for safe riding is learning how to perform them and. Hold this signal for two to three. All illustrations by matt ward / www.linguistine.com. Or, stick out your right hand. Signal left turns by extending your left arm straight out to the left. It’s a great idea to use hand signals to communicate to other people on streets and bike paths when you are turning or stopping. The first step in using these signals for safe riding is learning how to perform them and practicing the motions. Learn how to communicate with other cyclists and road users using bike hand signals. Hold this signal for two to three. Stick your left arm out to the side. Always make sure you can control your bike first! This image from national highway traffic safety administration (nhtsa) shows hand signals. It’s a great idea to use hand signals to communicate to other people on streets and bike paths when you are turning or stopping. Here’s our guide to the key signals and calls you need to know to stay safe on the road. Signal right turns by extending. Stick your left arm out to the side. Signal right turns by extending your right arm or upturning your left arm. This forms an arrow pointing to the right. Hand signals for biking use your hands to signal turns and stops! The first step in using these signals for safe riding is learning how to perform them and practicing the motions. Here are the most common hand signals you need to know when riding in a group. This handout discusses how to let other road. Now that your child is driving (his bicycle), he needs to learn the rules of the road. Hand signals are the easiest way to communicate with others while you are riding your bike. It’s a great idea to use hand signals to communicate to other people on streets and bike paths when you are turning or stopping. Always make sure you can control your bike first! Bend your left elbow, and stick. All illustrations by matt ward / www.linguistine.com. Now that you are driving your first vehicle (your bicycle), it’s time to learn some of the rules of the road for communicating with other road users. Or, stick out your right hand. Signal your intentions clearly and early.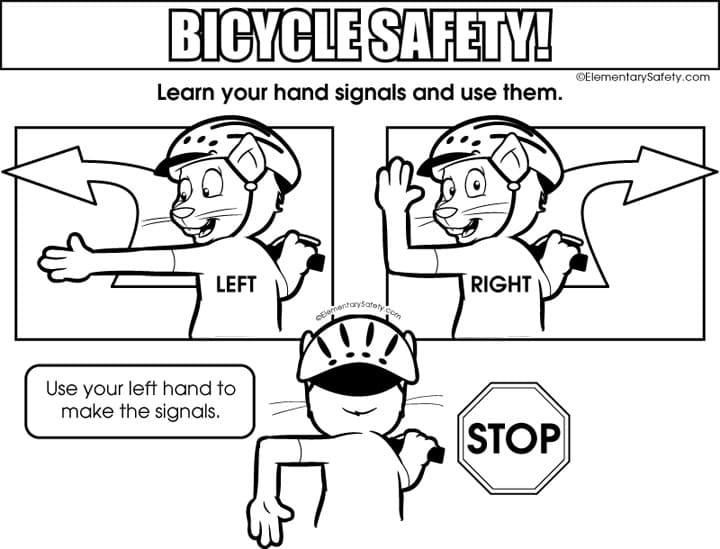
Hand Signals Bicycle Safety

How to use hand signals when you bike

Bicycle hand signals by Issuu
Bike Hand Signals Printable
Bicycle Hand Signals Bicycle NSW
947 Bike hand signals Images, Stock Photos & Vectors Shutterstock

Bike Safety & Hand Signals

Basic Bike Hand Signals You Should Know Small Town Bike Co
Bicycle Hand Signals Chart
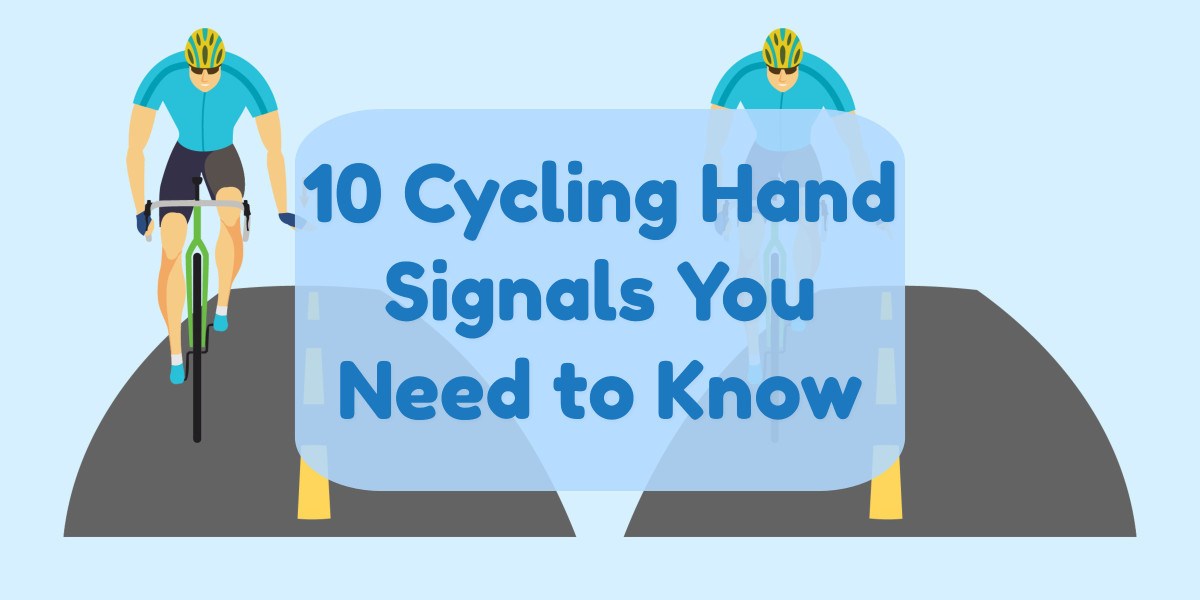
Cycling Hand Signals For A Safe Ride
See Pictures And Tips For Left Turn, Right Turn, Straight On, Slowing Down, Stopping, Rough Terrain, Point Out, Going Around, And More.
In This Printable, Geoffrey Shows Kids The Proper Signals, Plus They Can Play A Matching Game And Color The Sheet.
Hold This Signal For Two To Three.
Signal Left Turns By Extending Your Left Arm Straight Out To The Left.
Related Post: